[Interlude] Deploying ML models as a Model-as-a-Service (MaaS)
Goal and rationale
If you, like me, come from an academic background, chances are that your experience with deep learning models is limited to training and evaluating them in a research context. However, deploying a model is a whole other can of worms, and requires different sets of tools and skills. In this interlude, I walk us through the process of taking our trained speech enhancement model, and deploy it as a MaaS that can be accessed by anyone with an internet connection. We will use our speech enhancement model as an example. The service is available here.
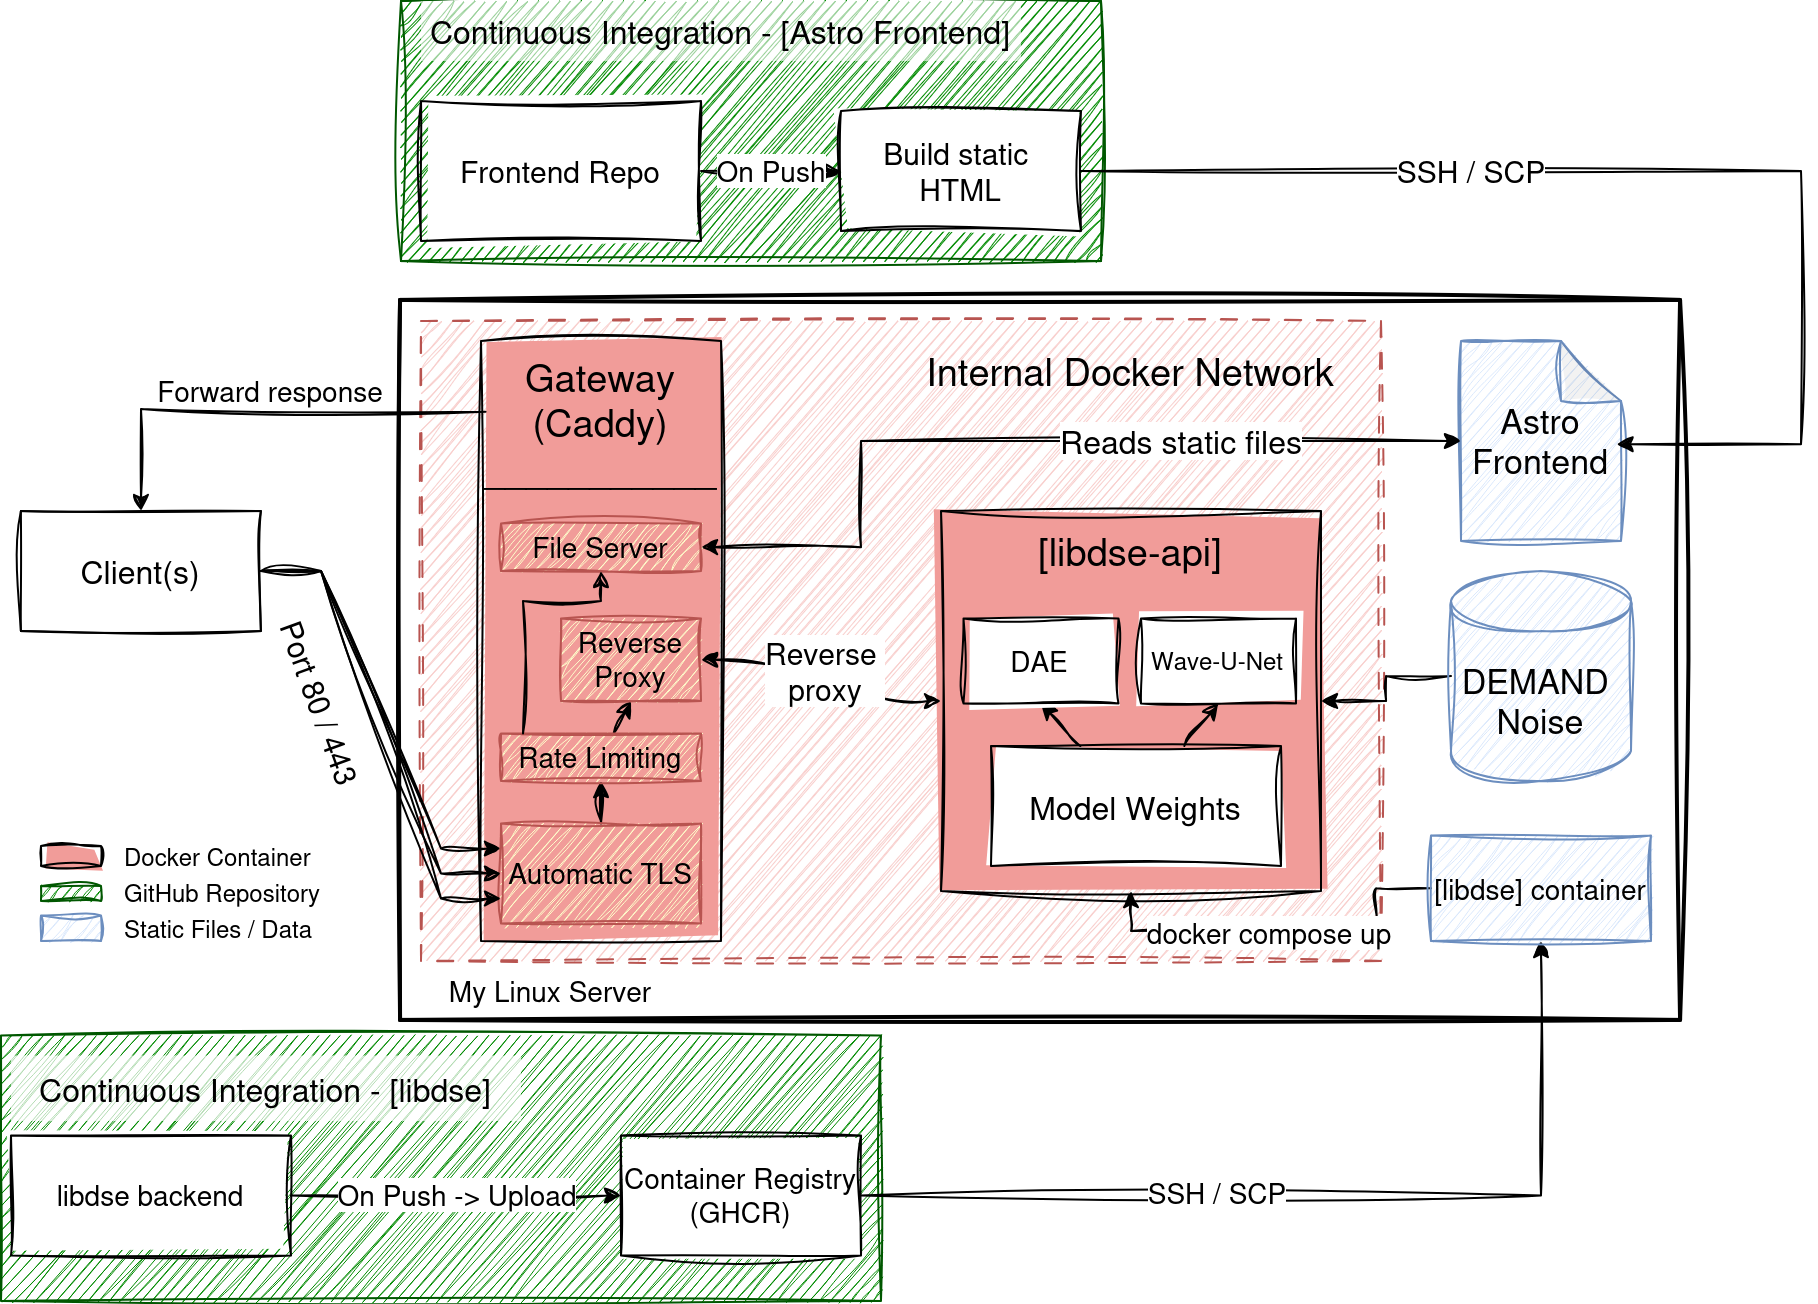
Our target architecture will look like this (no worries, we’ll go through each component in detail):
For this, I want to take my time, and not only explain to you what components to use, and how to wire them, but also why we would want to use them, and what alternatives there are. It is targeted towards readers with little to no experience in deploying ML models, and I will try to keep it expressive and intuitive.
We will cover the following topics:
- The API: how to make our model accessible via HTTP requests, and how to design and implement the API endpoints.
- The encapsulation: how to package our model and its dependencies in a way that makes it easy to deploy and run on different environments.
- The server and runtime: Where to run our API server, and how to set it up and manage it.
- The gateway: how to manage and secure access to our API, and ensure that only authorized clients can access it.
- The continuous deployment (CD) pipeline: how to automate the deployment process, and ensure that our model is always up-to-date and running smoothly.
The API
What is an API?
API stands for Application Programming Interface, and it is a set of rules and protocols that allow different software applications to communicate with each other over the internet. You can think of a web API as a gateway between clients and resources on the web. The clients want access to a resource, and the API is the interface that allows them to do so. Resources are the information that applications provide to their clients. The API exposes these information to the clients through endpoints, which are specific URLs that clients can send requests to in order to access the resources.
Usually, APIs can follow different architectural styles, such as REST, GraphQL, or gRPC. In this interlude, we will focus on REST APIs, which are the most common type of web APIs. It is not strictly necessary to understand what the REST concept implies to understand how we implement the API, but I provide a refresher in the dropdown below for those interested.
What is REST?
REST stands for Representational State Transfer, and it is an architectural style for designing networked applications. It was introduced by Roy Fielding in his doctoral dissertation in 2000. REST is based on a set of principles that define how resources are represented and accessed over the web. The main principles of REST are:
- Statelessness: Each request from a client to a server must contain all the information needed to understand and process the request. The server should not store any information about the client’s state between requests.
- Client-Server Architecture: The client and server are separate entities that communicate with each other over a network. The client is responsible for the user interface and user experience, while the server is responsible for processing requests and managing resources.
- Uniform Interface: The API should have a consistent and standardized way of accessing resources. This includes using standard HTTP methods (GET, POST, PUT, DELETE) and using URLs to identify resources.
- Cacheability: Responses from the server can be cached by the client to improve performance and reduce latency.
- Layered System: The API can be composed of multiple layers, such as load balancers, proxies, and gateways, which can be used to improve scalability and security.
Designing the API
Okay, so let’s think about what resources (information) we would want to provide to clients of our speech enhancement model.
- First and foremost, we want to expose the model itself, so that clients can send audio data to the API and receive enhanced audio back. This is our main resource - an enhanced audio prediction - and we expose it through the endpoint
/predict. - We may also want our clients to know what models are available (given we have more than one). The resource here is the list of available models, exposed through the endpoint
/models.
Noticed the subtle difference between the resource and the endpoint? The resource is the information we want to provide, and the endpoint is the URL through which clients can access that information.
In the final implementation, I added two more endpoints,
/mix-noiseand/noise-types, serving a noise-mixed audio resource and a list of noise types resource, respectively. They are just for convenience.
Implementing the API
Our speech enhancement model is implemented in Python, which leaves us with a few standard picks. The most popular ones are Flask and FastAPI. Both are lightweight web frameworks that allow us to quickly set up a web server and define our API endpoints. For our mini project, you can use either of them, but I chose FastAPI today (However the learning curve is a bit steeper, as you need to understand basic async programming in Python to use it effectively).
Let’s look at the implementation of the /predict endpoint, which is the main one. Most other endpoints are even simpler. You can check them out in the libdse repository API file.
Okay hold on for a minute, we need to do one more step. After training our model, we saved the trained weights as a torch state_dict file. To perform inference with the model, we need to instantiate the model architecture, and then load the weights into it. This is expensive, and can, depending on the model size, take up to a few seconds. Now, it would be smart to not do this every time a client sends a request to the API, but rather do it once when the server starts, and then keep the model in memory to serve all incoming requests. We will do this by leveraging FastAPI’s Lifespan Events, which define events that happen during the startup and shutdown of the server. You can find a discussion on why we not just load the model at the global scope in the dropdown below.
Why not load the model at the global scope?
The fun fact here is, that for this project it would be perfectly fine to load the model at the global scope, and it would work just as well. But this only works because (1) the VPS I am hosting the API on has no graphical resources (GPUs) and I only run one instance of the API server.
In a production environment, however, you would likely want to run multiple instances of the API server to handle more traffic, and you would likely want to leverage GPUs to speed up inference. In this case, loading the model at the global scope would lead FastAPI to load the model before forking itself to create multiple worker processes. Using CUDA this would lead to a RuntimeError: Cannot re-initialize CUDA in forked subprocess error, as CUDA contexts cannot be shared between processes. By using the Lifespan Events, we ensure the we fork the server to create multiple worker processes before loading the model, and thus avoid this issue.
You can also check out this Reddit discussion on the topic for more insights.
In Python, the skeleton implemented uses an async context manager and passes it to the lifespan parameter of the FastAPI app:
from contextlib import asynccontextmanager
from fastapi import FastAPI

@asynccontextmanager
async def lifespan(app: FastAPI):
    # This code will run when the server starts up
    model = load_model()  # Load the model and keep it in memory
    app.state.model = model  # Store the model in the app state for later use
    yield  # This is where the server will start accepting requests
    # This code will run when the server shuts down
    del model  # Clean up the model from memory (optional)

app = FastAPI(lifespan=lifespan)  # Pass the lifespan context manager to the FastAPI app
In my actual implementation, I do not just load the model, but also an entire inference pipeline, which accepts numpy arrays as input, performs all necessary preprocessing, feeds the data through the model, and then performs all necessary postprocessing to return the enhanced audio as a numpy array. This way, the API has a unified interface, and does not need to worry about the details of how the model works. The API just needs to call the pipeline with the input data, and return the output data.
To make sure I always load the correct model, I pinned all hyper parameters, as well as model related functions (inference classes, feature extractors, etc) in a hyperparams.json file.
Let’s look at the skeleton implementation of the /predict endpoint now, and explain it step by step:
import io
import soundfile as sf
from fastapi import FastAPI, UploadFile, File, Request
from fastapi.responses import StreamingResponse

_hyperparameters: dict[str, Any]  # Loaded hyperparameters from the JSON file

@app.post("/predict")
async def predict(
    model: str, request: Request, audio_file: UploadFile = File(...)) -> StreamingResponse:
    """
    Perform inference with the specified model on the input
    audio file, and return the enhanced audio as a streaming
    response.
    """

    # Get the cache (model_cache is defined in the `lifespan` function)
    cache = request.app.state.model_cache

    # Check if `model` exists in the cache (skip for brevity)
    ...

    model = _hyperparameters[model]["name"]  # Map from model key to model name
    pipeline = cache[f"{model}_pipeline"] # Inference pipeline
    feature_extractor = cache[f"{model}_feature_extractor"]

    # Read the input audio bytes
    audio_bytes = await audio_file.read()  # Read the uploaded file as bytes

    # Load the audio data from a file-like object created from the bytes
    audio_data, sample_rate = sf.read(io.BytesIO(audio_bytes))

    expected_sr = feature_extractor.sampling_rate

    # Resample the audio if the sample rates do not match
    ... # Resampling code (skip for brevity)

    # Inference
    enhanced_audio = pipeline.run(audio_data)

    # Write data to a file-like object in memory
    output_buffer = io.BytesIO()
    sf.write(output_buffer, enhanced_audio, expected_sr, format="WAV")
    output_buffer.seek(0)  # Rewind buffer pointer to the beginning
    return StreamingResponse(
        output_buffer,
        media_type="audio/wav",
        headers={"Content-Disposition": "attachment; filename=enhanced.wav"},
    )
Let’s break down the code step by step:
-
We define the endpoint using the
@app.post("/predict")decorator, which tells FastAPI that this function should be called when a POST request is made to the/predictendpoint. -
The function accepts three parameters:
model, which is a string that specifies which model to use for inference;request, which is the FastAPI request object that contains information about the incoming request, but more importantly gives us access to the app state where we stored our model cache; andaudio_file, which is an uploaded file that contains the input audio data, telling FastAPI that this parameter should be treated as a file upload. -
We first access the model cache from the app state, which we populated during the server startup in the
lifespanfunction. -
We then retrieve the inference pipeline and feature extractor for the requested model from the cache.
-
We read the input audio file as bytes, and then use the
soundfilelibrary to load the audio data from a file-like object created from the bytes. This gives us a NumPy array containing the audio samples, as well as the sample rate of the input audio. -
After a possible resampling step, we pass the audio data through the inference pipeline to get the enhanced audio.
-
Finally, we write the enhanced audio data to a file-like object in memory, and return it as a
StreamingResponse, which allows us to stream the response back to the client without having to load the entire enhanced audio into memory at once. We also set the appropriate headers to indicate that the response is an audio file that should be downloaded by the client.
Why use StreamingResponse? What are we streaming?
In this implementation, it is not immediately obvious why we are using a StreamingResponse, as we generate the enhanced audio in one go, and thus must have all data in memory at the time of returning the response. Also, the StreamingResponse expects an iterable as input. So why not just return a FileResponse?
The StreamingResponse has two advantages in this case:
- Skipping disk I/O: The file-like object we pass to the
StreamingResponseis an in-memory buffer, so we can skip the actual writing to file that would be required if we were to write the enhanced audio to a temporary file and then return aFileResponsepointing to that file. This can improve performance and reduce latency, especially for larger audio files. It also simplifies our code, as we do not need to worry about cleaning up temporary files after the response is sent (Python’s garbage collection will take care of cleaning up the in-memory buffer once it is no longer needed). - Enhancing client experience: On closer inspection, we find that the
io.BytesIOobject we passed to the response inherits fromio.BufferedIOBase, which implements thereadmethod, making it an iterable. This means that theStreamingResponseactually sends the response in chunks, providing a smoother download experience for the client.
Perfect, we have our API implemented! It may seem tempting to rent a server, copy over the project code, run FastAPI with uvicorn and call it a day, but there are good reasons to not do that, and instead use some form of encapsulation, which we will cover in the next section.
The encapsulation
If we now were to rent a server, copy over our project code, install its dependencies, and run the API server, we would have a working deployment. However, this approach has several drawbacks:
-
Environment consistency: The server environment may differ from our local development environment, leading to issues with dependencies, library versions, or even the operating system. This can cause our model to not work as expected, or even fail to run at all.
-
Dependency clash: If we want to run multiple models on the same server, or if we want to run other applications alongside our API server, we may run into issues with dependency clashes, where different applications require different versions of the same library.
The industry standard solution to these issues is to use some form of encapsulation, which allows us to package our model and its dependencies in a way that makes it easy to deploy and run on different environments. The most popular form of encapsulation is Docker, which allows us to create lightweight, portable containers that can run our application and its dependencies in isolation from the host system. You can imagine a Docker container as a mini virtual machine that has its own file system, its own network interface, and its own process space. This allows us to ensure that our model will run the same way on any server that supports Docker, regardless of the underlying environment.
The single most important file in a Docker-based deployment is the Dockerfile, which is a text file that contains instructions on how to build a Docker image for our application. The Docker image is a snapshot of our application and its dependencies at a given point in time.
Dockerfile for our libdse API
You can find the complete Dockerfile I used here, but let’s go through the most important parts of it step by step:
# ── Base image ────────────────────────────────────────────────────────────────
FROM python:3.12-slim

# ── System dependencies ───────────────────────────────────────────────────────
# ...  Install system dependencies (e.g., OpenMP, ffmpeg, etc.)

WORKDIR /app

# ── Python dependencies ───────────────────────────────────────────────────────
COPY pyproject.toml .

# Install CPU-only PyTorch
RUN pip install --no-cache-dir \
        torch --index-url https://download.pytorch.org/whl/cpu

# ── Application source ────────────────────────────────────────────────────────
COPY src/ src/
COPY models/ models/
COPY app.py .

# Install the package and all dependencies declared in pyproject.toml
RUN pip install --no-cache-dir .

# ── Runtime ───────────────────────────────────────────────────────────────────
EXPOSE 7860

# Run FastAPI on port 7860.
CMD ["uvicorn", "app:app", "--host", "0.0.0.0", "--port", "7860"]
As a base image, we use the official Python 3.12 slim image, which is a lightweight debian image with Python 3.12 installed. We then install any system dependencies that our application may require, such as OpenMP for parallel processing, or ffmpeg used by librosa. We set the working directory to /app, which is where we will copy our application code. We then copy the pyproject.toml file, which contains the Python dependencies for our application, and install the CPU-only version of PyTorch (since our VPS has no GPU). After that, we copy the rest of our application source code, and install our package using pip install ., which will also install all dependencies declared in pyproject.toml. Finally, we expose port 7860, which is the port that our FastAPI server will run on, and set the command to run the server using uvicorn.
What we are left with, is a Docker image that contains our application and all its dependencies, and can be run on any server that supports Docker. We can then use this image to create a container, which is a running instance of the image, and deploy it on our server. We will see how all of this comes together in the final section on continuous integration and deployment.
Now that we have our API implemented and encapsulated, we can focus on the server and runtime, which is where we will actually run our API server and make it accessible to clients.
The server
Starting with the bare metal, we have various options to choose from when it comes to hosting our API server. We could use a cloud provider like AWS, GCP, or Azure, which offer various services for hosting and managing web applications. We could also use a platform-as-a-service (PaaS) provider like Heroku, which abstracts away much of the infrastructure management and allows us to focus on our application code. Finally, we could use a virtual private server (VPS) provider like DigitalOcean or Linode, which gives us more control over the server environment and can be more cost-effective for smaller projects.
For the sake of learning infrastructure management, I chose to go with the VPS option, and I am hosting the API on a Contabo VPS, which is a European low-coster. I am using a VPS with 4 vCPUs, 8 GB of RAM, and no GPU, which is sufficient for our speech enhancement model costing me roughly 5€/month.
What software do we need on the server?
Out of the box, a VPS usually comes with a basic Linux distribution installed, and we have to set up the rest ourselves. In my case I am using Ubuntu 22.04.5 LTS (Long-Term Support), which is a popular choice for servers due to its stability and security.
For the setup we are using, the only thing we actually need to manually install on the server is Docker, which you can do by following the official Docker installation guide for Ubuntu. This allows us to run our API server in a container, which we will build from the Dockerfile we created in the previous section.
It is also advised to add your user to the
dockergroup, which allows you to run Docker commands without needing to usesudo. You can do this by runningsudo usermod -aG docker $USER, and then logging out and back in for the changes to take effect (or by runningnewgrp dockerin the terminal).
Adding a deployment user
While we could run our API server using the default user on the VPS, it is generally a good practice to create a separate user for deployment purposes. This adds an extra layer of security, as we can restrict the permissions of this user to only what is necessary for running the API server, and it also helps with organization and management of our deployment files. To create a new user, you can use the adduser command in the terminal:
sudo adduser deploy
We will take advantage of this user later when we set up our continuous deployment pipeline, as it will allow us to securely connect to the server and deploy our API without needing to use the root user.
We are now one step away from being able to run our API server on the VPS. If we were to run our docker container right now, it would be accessible at the VPS’s IP address on port 7860 (e.g., http://<VPS_IP_ADDRESS>:7860). However, this is considered bad practice for several reasons:
-
Security: Exposing our API server directly to the internet on a non-standard port can make it more vulnerable to attacks, such as port scanning or brute-force attacks. It also means that we would need to implement our own security measures, such as rate limiting or IP whitelisting, to protect our API from malicious traffic.
-
SSL/TLS: If we want to secure our API with SSL/TLS (which we should), we would need to set up and manage the certificates ourselves, which can be complex and time-consuming.
The gateway
To avoid all of the above issues at once, we use a Gateway, which -in our case- is a piece of software called Caddy. Caddy is an open source web server with automatic HTTPS written in Go. It is designed to be simple to use and configure, and it provides a lot of features out of the box, such as automatic SSL/TLS certificate management, reverse proxying, load balancing, and more.
Recap: Why would we need something like Caddy?
Since this post is targeted towards beginners, let’s build some more general intuition here. Whenever data send over the internet via TCP reaches your computer, it first lands in your network interface card (NIC), which is a hardware component that connects your computer to the network. The NIC then passes the data to the operating system’s network stack, which processes the data and determines which application should receive it based on the destination port number.
The world has agreed on a convention that assigns specific port numbers to specific services. For example, unencrypted HTTP traffic (http://some-site.com) uses port 80, while encrypted HTTPS (https://some-site.com) traffic uses port 443. Let’s assume we received a packet of data addressed to port 443. Our operating system will then look though its routing table to determine which application is listening on that port, and forward the data to that application. If no application is listening on that port, the operating system will drop the packet and send an error message back to the sender.
In our case, Caddy is the application that listens on port 443 (and also 80). Since our operating system will just blindly forward any incoming traffic on port 443 to Caddy, we must make sure that Caddy knows what to do with that traffic. Especially since there may be multiple applications running on the same server, and thus multiple applications that want to receive traffic on port 443. The website you read right now is also hosted on the same VPS, and thus also receives traffic on port 443. Caddy allows us to define rules for how to route incoming traffic based on various criteria, such as the domain name, the path, the headers, etc. In our case, we want to route any traffic that is addressed to api.libdse.nikpau.io to our API server running on port 7860. Caddy will then take care of forwarding the traffic to the correct application. This is called reverse proxying, and it allows us to expose our API server to the internet without having to expose it directly on a non-standard port.
Caddy also takes care of automatically obtaining and renewing SSL/TLS certificates for our domain, which means that our API will be accessible securely via HTTPS without us having to do any additional work. (This was the main reason I switched from Nginx to Caddy midway through the project).
Depending on your VPS configuration, you may already have a web server like Nginx or Apache installed, which can also be used as a gateway server. However, I found Caddy to be more user-friendly and easier to set up for our use case.
For simple projects like ours, Caddy is super simple to set up. It requires a single configuration file, called Caddyfile, which defines the routing rules for incoming traffic. The part for our API looks like this:
api.libdse.nikpau.io {
    encode gzip zstd # https://caddyserver.com/docs/caddyfile/directives/encode
    reverse_proxy libdse-api:7860
}
That’s it! With this configuration, any incoming traffic to api.libdse.nikpau.io will be automatically encrypted with SSL/TLS, and then forwarded to our API server running on port 7860. Caddy will also take care of obtaining and renewing the SSL/TLS certificates for our domain, so we don’t have to worry about that at all.
Note that I run both the API server and Caddy in separate Docker containers, and I use Docker Compose to manage both containers and their networking. This allows me to easily link the two containers together, and refer to the API server container by its name (
libdse-api) in the Caddy configuration. Otherwise, we would need to use the IP address of the API server container, which can be more difficult to manage and less reliable.
Docker Compose and internal networking
When you have multiple Docker containers (in our case, one for the API server and one for Caddy), you can use Docker Compose to define and manage the multi-container application. Docker Compose allows you to define your application services, networks, and volumes in a single docker-compose.yml file, and then start all the services with a single command.
One of the biggest advantages of using Docker Compose is that it sets up an internal network for the containers, which allows them to communicate with each other using their service names as hostnames. In our case, we can refer to the API server container as libdse-api in the Caddy configuration, and Docker Compose will automatically resolve that to the correct IP address of the API server container. This makes it much easier to manage the communication between the containers, and also makes our setup more robust, as we don’t have to worry about figuring out the IPs of each container, and make sure they do not change (which can happen if we restart the containers, or if we scale up the number of API server instances). You can find the complete docker-compose.yml file I used in my infra repo here.
Rate limiting with Caddy
You will find that my actual implementation of the Caddy configuration file uses rate limiting. While this is a good practice in general to protect your endpoint from malicious traffic, I also use it as the only security measure for the API, as I do not implement any authentication or authorization mechanism. This means that anyone can access the API as long as they know the endpoint URL. To mitigate the risk of abuse, I set up a rate limit of 10 requests per minute per IP address, which should be sufficient for our use case, while still allowing legitimate users to access the API without issues.
Caddy does not have built-in support for rate limiting, but there are third-party plugins that can be used to add this functionality. I use the caddy-rate-limit plugin for this. Since it does not ship with the official Caddy image, I had to build a custom Caddy image with the plugin included like so:
FROM caddy:builder AS builder

RUN xcaddy build \
    --with github.com/mholt/caddy-ratelimit

FROM caddy:latest
COPY --from=builder /usr/bin/caddy /usr/bin/caddy
The rate limit is then defined by simply adding the rate_limit directive to the relevant section in the Caddyfile.
With the gateway set up, we can now access our API securely via https://api.libdse.nikpau.io, and we can be confident that our API server is protected from malicious traffic, and that our SSL/TLS certificates are being managed properly.
If we agreed to manually updating the API if anything changed, we would be done!
We could navigate to our folder containing the docker-compose.yml (or Dockerfile if we are not using Docker Compose), and run
docker-compose up -d --build
or
docker build -t libdse-api . && docker run -d -p 7860:7860 --name libdse-api libdse-api
which would build our images and make our API accessible at https://api.libdse.nikpau.io. Success! :) We now build and configured all components from Fig. 1, except for the arrows connecting the GitHub repositories to the API, which represent the continuous deployment pipeline, which we will cover in the next section.
The continuous deployment (CD) pipeline
While the above manual deployment process works, in an actual use case (say you are a company that has a team of data scientists and ML engineers working on improving the model, and you want to deploy the latest version of the model to production every time there is an update), you would want to automate this process as much as possible, to ensure that your API is always up-to-date with the latest improvements, and to reduce the chances of human error during deployment. This is where continuous deployment comes in. CD is a software development practice where code changes are automatically built, tested, and deployed to production without manual intervention. This allows for faster and more reliable deployments, as well as quicker feedback loops for developers.
Since our code is hosted on GitHub, we can leverage GitHub Actions to set up a CD pipeline that automatically deploys our API server whenever there is a new commit to the main branch of our repository. The basic idea is to define a workflow in a YAML file that specifies the steps to build and deploy our application, and then trigger this workflow whenever there is a push to the main branch. We want to:
- Build our Docker image for the API server using the
Dockerfilewe created earlier. - Push the built image to a container registry, such as Docker Hub or GitHub Container Registry.
- Connect to our VPS server using remote access (like SSH), pull the latest Docker image, and restart the API server container to apply the updates.
In fact, this is exactly what I do in the GitHub Action workflow defined in the libdse docker.yml workflow file
As you see in Fig. 1, there is also a CD path for the frontend (the webpage you are reading right now). You could argue, that it has nothing to do with the speech enhancement model deployment, and you would be right. However, since both systems are hosted on the same VPS, and both use Caddy as a gateway, it made sense for me to also include it into the architecture diagram for completeness.
Conclusion
That was a lot! Thanks for sticking around. In this post, we have covered the entire process of deploying a speech enhancement model as an API, starting from designing and implementing the API, to setting up the server and gateway, and finally automating the deployment process with a continuous deployment pipeline. We have seen how to use FastAPI to implement a REST API for our model, how to use Docker to encapsulate our application and its dependencies, how to use Caddy as a gateway to securely expose our API to the internet, and how to use GitHub Actions to automate the deployment process.
I hope that this post sparked some curiosity and provided you with a solid starting point for making your machine learning models accessible to the world. If you have any questions, suggestions, or just want to chat about anything related to this post, feel free to reach out to me on LinkedIn or GitHub. Thanks for reading! :)